Battery switch on travel trailer function is crucial for safe and efficient power management. Understanding how your battery switch works is key to preventing electrical issues and maximizing your RV’s power capabilities. This guide breaks down the different types of switches, their purposes, and how to properly use and maintain them, ensuring smooth sailing on your next adventure.
From the simple single-pole switch to the more complex double-pole double-throw (DPDT) switch, we’ll explore the inner workings and benefits of each. We’ll also cover connecting and disconnecting batteries, troubleshooting common problems, and integrating your battery switch with other RV electrical components like converters, inverters, and solar panels. Get ready to become a battery switch expert!
Connecting and Disconnecting Batteries
Safe and proper battery connection and disconnection are crucial for preventing damage to your RV’s electrical system and ensuring the longevity of your batteries. Using the battery switch correctly is key to managing power efficiently and avoiding potentially hazardous situations.
So, you’re planning a trip? Awesome! First things first: get travel insurance. Check out Aon travel insurance for comprehensive coverage. Then, if you’re an audiophile like me, don’t forget your tunes! Planning your audiophile travel setup is key for enjoying your favorite music on the go. Make sure you pack appropriately and enjoy your amazing trip!
Your battery switch acts as a central control point, allowing you to isolate or connect your batteries to the trailer’s electrical system. Understanding how to use it correctly is essential for both charging and using your house batteries while camping.
Battery Connection Procedure
Connecting your batteries involves carefully switching the power on, ensuring a secure connection at each step. Always follow these steps to prevent sparks or accidental short circuits.
- Inspect Connections: Before turning the switch, visually inspect all battery terminals and cables for corrosion, loose connections, or damage. Clean any corrosion with a wire brush and baking soda solution if necessary.
- Turn Switch to “Both” or “On”: Locate your battery switch and carefully rotate it to the “Both” position (if your switch has this option, connecting both house and starting batteries) or the “On” position (connecting only the house batteries). This will establish a connection between the batteries and the trailer’s electrical system.
- Verify Power: Check your trailer’s 12V system to ensure power is flowing correctly. Turn on lights, fans, or other appliances to confirm the connection.
Battery Disconnection Procedure
Disconnecting your batteries is just as important as connecting them. Proper disconnection protects your system and prevents accidental power drain.
- Turn Off Appliances: Before disconnecting, ensure all 12V appliances in your trailer are turned off. This prevents any residual current draw that could lead to a low battery voltage.
- Turn Switch to “Off”: Rotate the battery switch to the “Off” position. This isolates the batteries from the trailer’s electrical system, preventing any power flow.
- Optional: Turn to “Start”: If your switch has a “Start” position, you can select it to allow only the starting battery to power the engine for starting, while leaving the house batteries disconnected.
Battery Switch and Connection Maintenance
Regular maintenance ensures the longevity and reliable performance of your battery switch and connections. Neglecting maintenance can lead to corrosion, loose connections, and eventual system failure.
- Regular Inspection: Inspect all battery terminals and cables for corrosion at least once a month. Clean any corrosion as needed.
- Tighten Connections: Periodically check the tightness of all battery terminal connections and cable clamps. Loose connections can cause excessive heat and damage.
- Switch Lubrication: Some battery switches benefit from periodic lubrication of the switch mechanism to ensure smooth operation. Consult your switch’s manual for recommendations.
- Corrosion Prevention: Apply a corrosion inhibitor or dielectric grease to the battery terminals and cable connections to prevent future corrosion.
Battery Switch Operation Flowchart
This flowchart visualizes the correct procedure for using the battery switch in various scenarios.
So, you’re planning a trip? Awesome! First things first: get yourself sorted with travel insurance. Check out Aon travel insurance for solid coverage. Once you’ve got that covered, it’s time to think about the finer things – like your audio setup! If you’re an audiophile, a good audiophile travel setup is a must for enjoying your favorite tunes on the go.
Make sure you pack accordingly!
[Imagine a flowchart here. The flowchart would have start/end points. Branches would show different scenarios: Charging (connect to shore power, switch to “Both” or “On”), Boondocking (switch to “Both” or “On” to use batteries), Storage (switch to “Off”), Starting Engine (switch to “Start”). Each step would be clearly labeled.]
Common Battery Switch Problems and Troubleshooting
Several common problems can arise with battery switches and their connections. Understanding these issues and their solutions can save you time and frustration.
| Problem | Possible Cause | Troubleshooting Steps |
|---|---|---|
| No power to 12V system | Switch in “Off” position; blown fuse; corroded connections; faulty switch | Check switch position; check fuses; inspect and clean connections; test switch continuity |
| Intermittent power | Loose connections; corroded connections; faulty switch | Tighten connections; clean connections; replace switch if necessary |
| Battery drain | Parasitic draw; faulty appliance; incorrect switch setting | Check for parasitic draws using a multimeter; test appliances; verify switch setting |
| Switch not turning | Switch seized; damaged mechanism | Try lubricating the switch; replace the switch if necessary |
Battery Switch and Electrical System Integration
The battery switch is the central control point for your travel trailer’s 12-volt DC power system. Understanding its relationship with other components is crucial for safe and efficient operation. This section will explain how the switch interacts with the converter, inverter, and solar panels, identify potential failure points, and guide you through basic troubleshooting using a multimeter.The battery switch acts as a gatekeeper, selectively connecting or disconnecting your house batteries from the rest of the electrical system.
This allows you to isolate the batteries for maintenance, prevent parasitic drain, or choose between different power sources. The converter, inverter, and solar panels all rely on the battery switch for power distribution, and their proper functioning depends on the switch’s correct operation.
The Battery Switch’s Role in Power Distribution
The converter, typically powered by 120V AC shore power, charges the batteries and provides 12V DC power to the trailer’s lights, water pump, and other appliances. The inverter converts 12V DC battery power to 120V AC power, allowing you to run AC appliances like laptops or microwaves. Solar panels generate DC power, which is typically routed through a charge controller before reaching the batteries.
The battery switch manages the flow of power between these components and the batteries, ensuring that power is directed appropriately. A correctly functioning battery switch is essential for the proper operation of your entire electrical system. A faulty switch can lead to unexpected power outages, battery drain, or even damage to other components.
Potential Points of Failure in the Battery System
Several points within the system can cause problems. A corroded battery terminal connection, for example, can create high resistance, leading to voltage drops and poor charging. Loose or corroded wiring at the battery switch itself can cause intermittent power failures or complete system shutdowns. A faulty battery switch can fail in the “on” or “off” position, leading to constant power drain or the inability to access power.
Finally, problems within the converter, inverter, or solar charge controller can also indirectly affect the battery switch’s performance, creating complex troubleshooting challenges.
Diagnosing Electrical Problems with a Multimeter
A multimeter is an invaluable tool for diagnosing electrical problems. To check the battery switch, first, ensure the switch is in the “off” position. Then, use the multimeter’s voltage setting to measure the voltage across the battery terminals. You should read close to zero volts; if you see a voltage, it indicates a parasitic drain and a potential problem with the switch or wiring.
Next, switch the battery switch to the “on” position and measure the voltage across the battery terminals again. You should see a voltage close to the battery’s nominal voltage (typically 12.6V for a fully charged lead-acid battery). If not, there is a problem either at the switch or further down the line. You can then systematically check voltage at different points in the system to isolate the fault.
For example, check the voltage at the output of the converter, inverter, and solar charge controller. A significant voltage drop between any two points indicates a problem in the wiring or a faulty component.
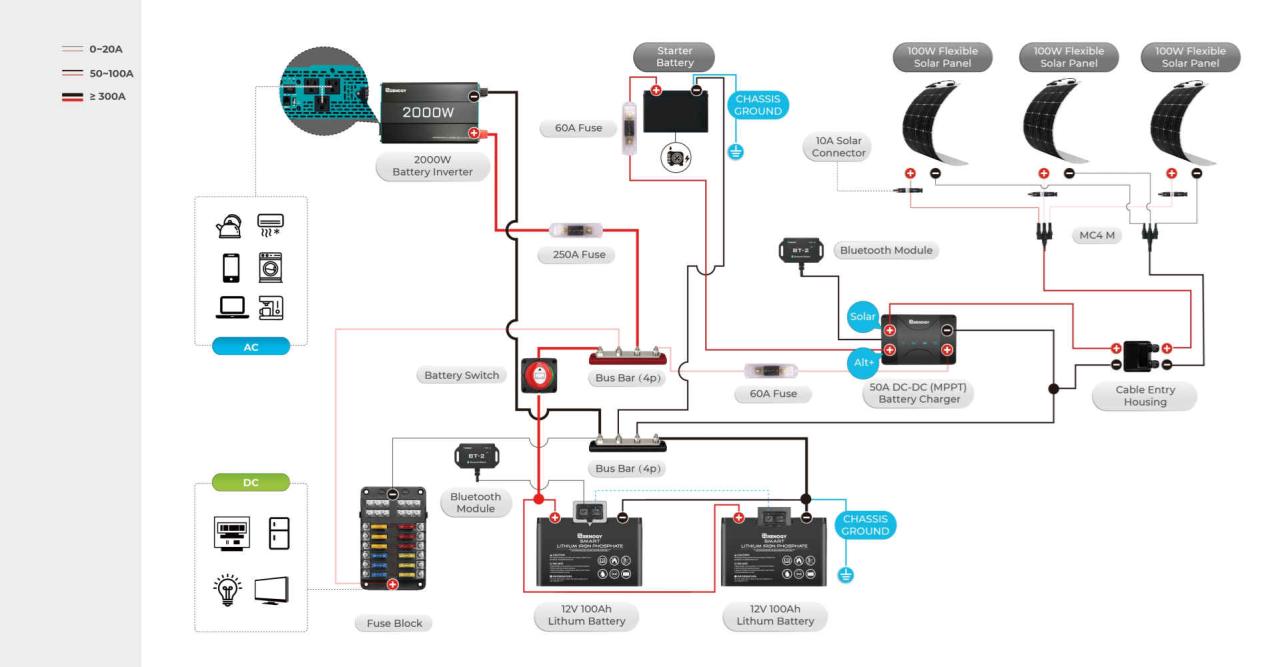
Typical Wiring Configuration Schematic Diagram
Imagine a simple diagram: Two batteries are connected in parallel to a battery switch. From the switch, two heavy-gauge wires lead to the converter. Another set of wires from the switch connects to the inverter. A third set of wires runs from the solar charge controller to the batteries. All these wires are protected by fuses or circuit breakers.
This basic setup allows the batteries to charge from shore power via the converter, and supply power to the inverter and other DC loads. The solar panels charge the batteries independently. The battery switch controls whether the batteries are connected to the converter and inverter. This diagram omits complexities like multiple battery banks or more sophisticated charge controllers for clarity.
However, it illustrates the fundamental connections and the role of the battery switch in the overall system.
Maintenance and Troubleshooting

Keeping your travel trailer’s battery switch in good working order is crucial for reliable power. Regular maintenance prevents problems and extends the lifespan of your switch, saving you time and money in the long run. Neglecting maintenance can lead to frustrating power outages and costly repairs.
Preventative Maintenance
Regular inspection and cleaning are key to preventing problems. A buildup of corrosion on the terminals can impede current flow and eventually lead to failure. At least twice a year, or more frequently in humid climates, inspect the battery switch for corrosion. Use a wire brush to clean the terminals and apply a corrosion inhibitor, such as dielectric grease, to protect them.
Also, visually inspect the switch itself for any signs of damage, loose connections, or overheating. Tighten any loose connections you find. This simple routine will significantly extend the life of your battery switch.
Troubleshooting Common Malfunctions
Several issues can cause problems with your battery switch. No power to your trailer could stem from a blown fuse, a faulty switch, or a problem with the battery connections. Intermittent power often points to loose connections or corrosion.
No Power Troubleshooting
First, check your batteries. Make sure they’re charged and properly connected. Then, visually inspect all wiring leading to and from the battery switch. Look for any loose, broken, or corroded wires or connections. Replace any damaged wires and clean any corrosion.
Next, check the fuses both in the battery switch and in the trailer’s main electrical panel. Replace any blown fuses. If the problem persists, carefully test the battery switch itself with a multimeter to verify that it’s operating correctly. If the switch is faulty, it will need to be replaced.
Intermittent Power Troubleshooting
Intermittent power often indicates loose connections or corrosion. Begin by carefully inspecting all connections at the battery switch and along the wiring harness. Tighten any loose connections and clean any corrosion. Pay close attention to the connections between the battery cables and the switch terminals. A small amount of corrosion can significantly disrupt the electrical current.
If the problem continues, test the battery switch with a multimeter to check for continuity. An intermittent connection within the switch itself might be the cause.
Identifying and Replacing a Faulty Battery Switch, Battery switch on travel trailer function
If your troubleshooting steps point to a faulty battery switch, replacement is necessary. Before starting, disconnect the negative battery cable to prevent accidental short circuits. Note the position of all wires and connections before disconnecting them. Take photos if needed. Unscrew the battery switch from its mounting location.
Install the new switch, ensuring all wires are securely reconnected in their original positions. Reconnect the negative battery cable and test the system to verify that the new switch is functioning correctly. Remember to always consult the wiring diagram for your specific travel trailer model.
Safety Precautions
Working with batteries and electrical systems requires caution. Always disconnect the negative battery cable before performing any maintenance or repairs. Wear safety glasses to protect your eyes from sparks or flying debris. Never work on the electrical system while it is energized. Use insulated tools to prevent accidental shocks.
If you are unsure about any step, consult a qualified electrician.
Mastering your travel trailer’s battery switch is a small step that leads to big rewards: peace of mind, efficient power management, and a more enjoyable RV experience. By understanding the different switch types, their functions, and basic maintenance, you can confidently handle any power situation. So, get out there and enjoy the open road knowing you’re in control of your RV’s power!
Questions Often Asked: Battery Switch On Travel Trailer Function
What happens if I accidentally connect the batteries in reverse polarity?
Connecting batteries in reverse polarity can severely damage your electrical system. It can blow fuses, damage components, and even cause a fire. Always double-check your connections before turning on the switch.
How often should I check my battery switch connections?
Inspect your battery switch and connections at least once a year, or more often if you frequently use your RV. Look for corrosion, loose wires, or any signs of damage.
My battery switch is making a clicking noise. What could be wrong?
A clicking noise often indicates a problem with the switch itself, potentially a faulty internal component or low battery voltage. Try cleaning the terminals and checking your battery voltage. If the problem persists, replace the switch.
Can I use a battery switch to isolate a single battery in a dual-battery setup?
Depending on the switch type, you might be able to isolate individual batteries. A DPDT switch allows for this, but a simple single-pole switch usually isolates both batteries together.
